
.png)
Guide to Webhook Integrations (with GitHub example)
Step by step guide to building a real time integration with webhooks (with examples for GitHub)

In today’s software, a lot of interesting events happen: A new user signs up for an email list. A new prospect is added to the CRM. A new customer starts a subscription. An email arrives.
How can your application efficiently and effectively respond to these specific events in real-time?
The answer lies in the power of a webhook integration.
Popular webhook integration examples
Webhook integrations provide a powerful way for applications to get real-time data and communication.
Some popular examples:
- Salesforce webhook integration: Get a webhook when an object in Salesfore is added, updated or deleted (e.g. Contact, Account, Opportunity, etc.)
- Jira webhook integration: Webhook trigger on ticket status change, new ticket created, etc.
- Github webhook integration: Receive a webhook when an issue changes, a commit is pushed, PR status is changed, etc.
- Stripe webhook integration: Payment received, Subscription started, payment declined, etc.
- many more...
Despite their power, handling webhooks comes with challenges, from securely verifying their source to managing high volumes without causing outages of your application.
Here, we will delve into the essentials of handling the webhook integration in your product integrations: From understanding their basic components, to implementing secure authentication, and scaling your application to accommodate a heavy influx of webhooks.
But let’s start with the fundamentals – what are webhook integrations and why can’t you just use regular REST APIs for this?
What are webhooks? How are they different from APIs?
With APIs, you request data and receive that data. With webhooks, you automatically receive data as it changes.
Webhooks are a type of "user-defined HTTP callback”. They provide real-time information to other applications. Essentially, they are a way for one application to provide other applications with real-time information, making it easy for users to receive notifications or data updates immediately when specific events occur.
Here's a technical breakdown of how webhooks work:
- An application (the "user") configures a webhook URL on the server-side of another application (the "provider"). This webhook URL is a specific endpoint in the user's application.
- The user also specifies which events on the provider's side should trigger the webhook.
- When the specified event occurs, the provider makes an HTTP request (typically a POST request) to the configured webhook URL. This request contains information about the event in its payload, often in the form of JSON.
- The user's application receives this HTTP request and can then use the provided data to carry out any required tasks, such as updating its own data, notifying other parts of the system, or triggering other workflows.
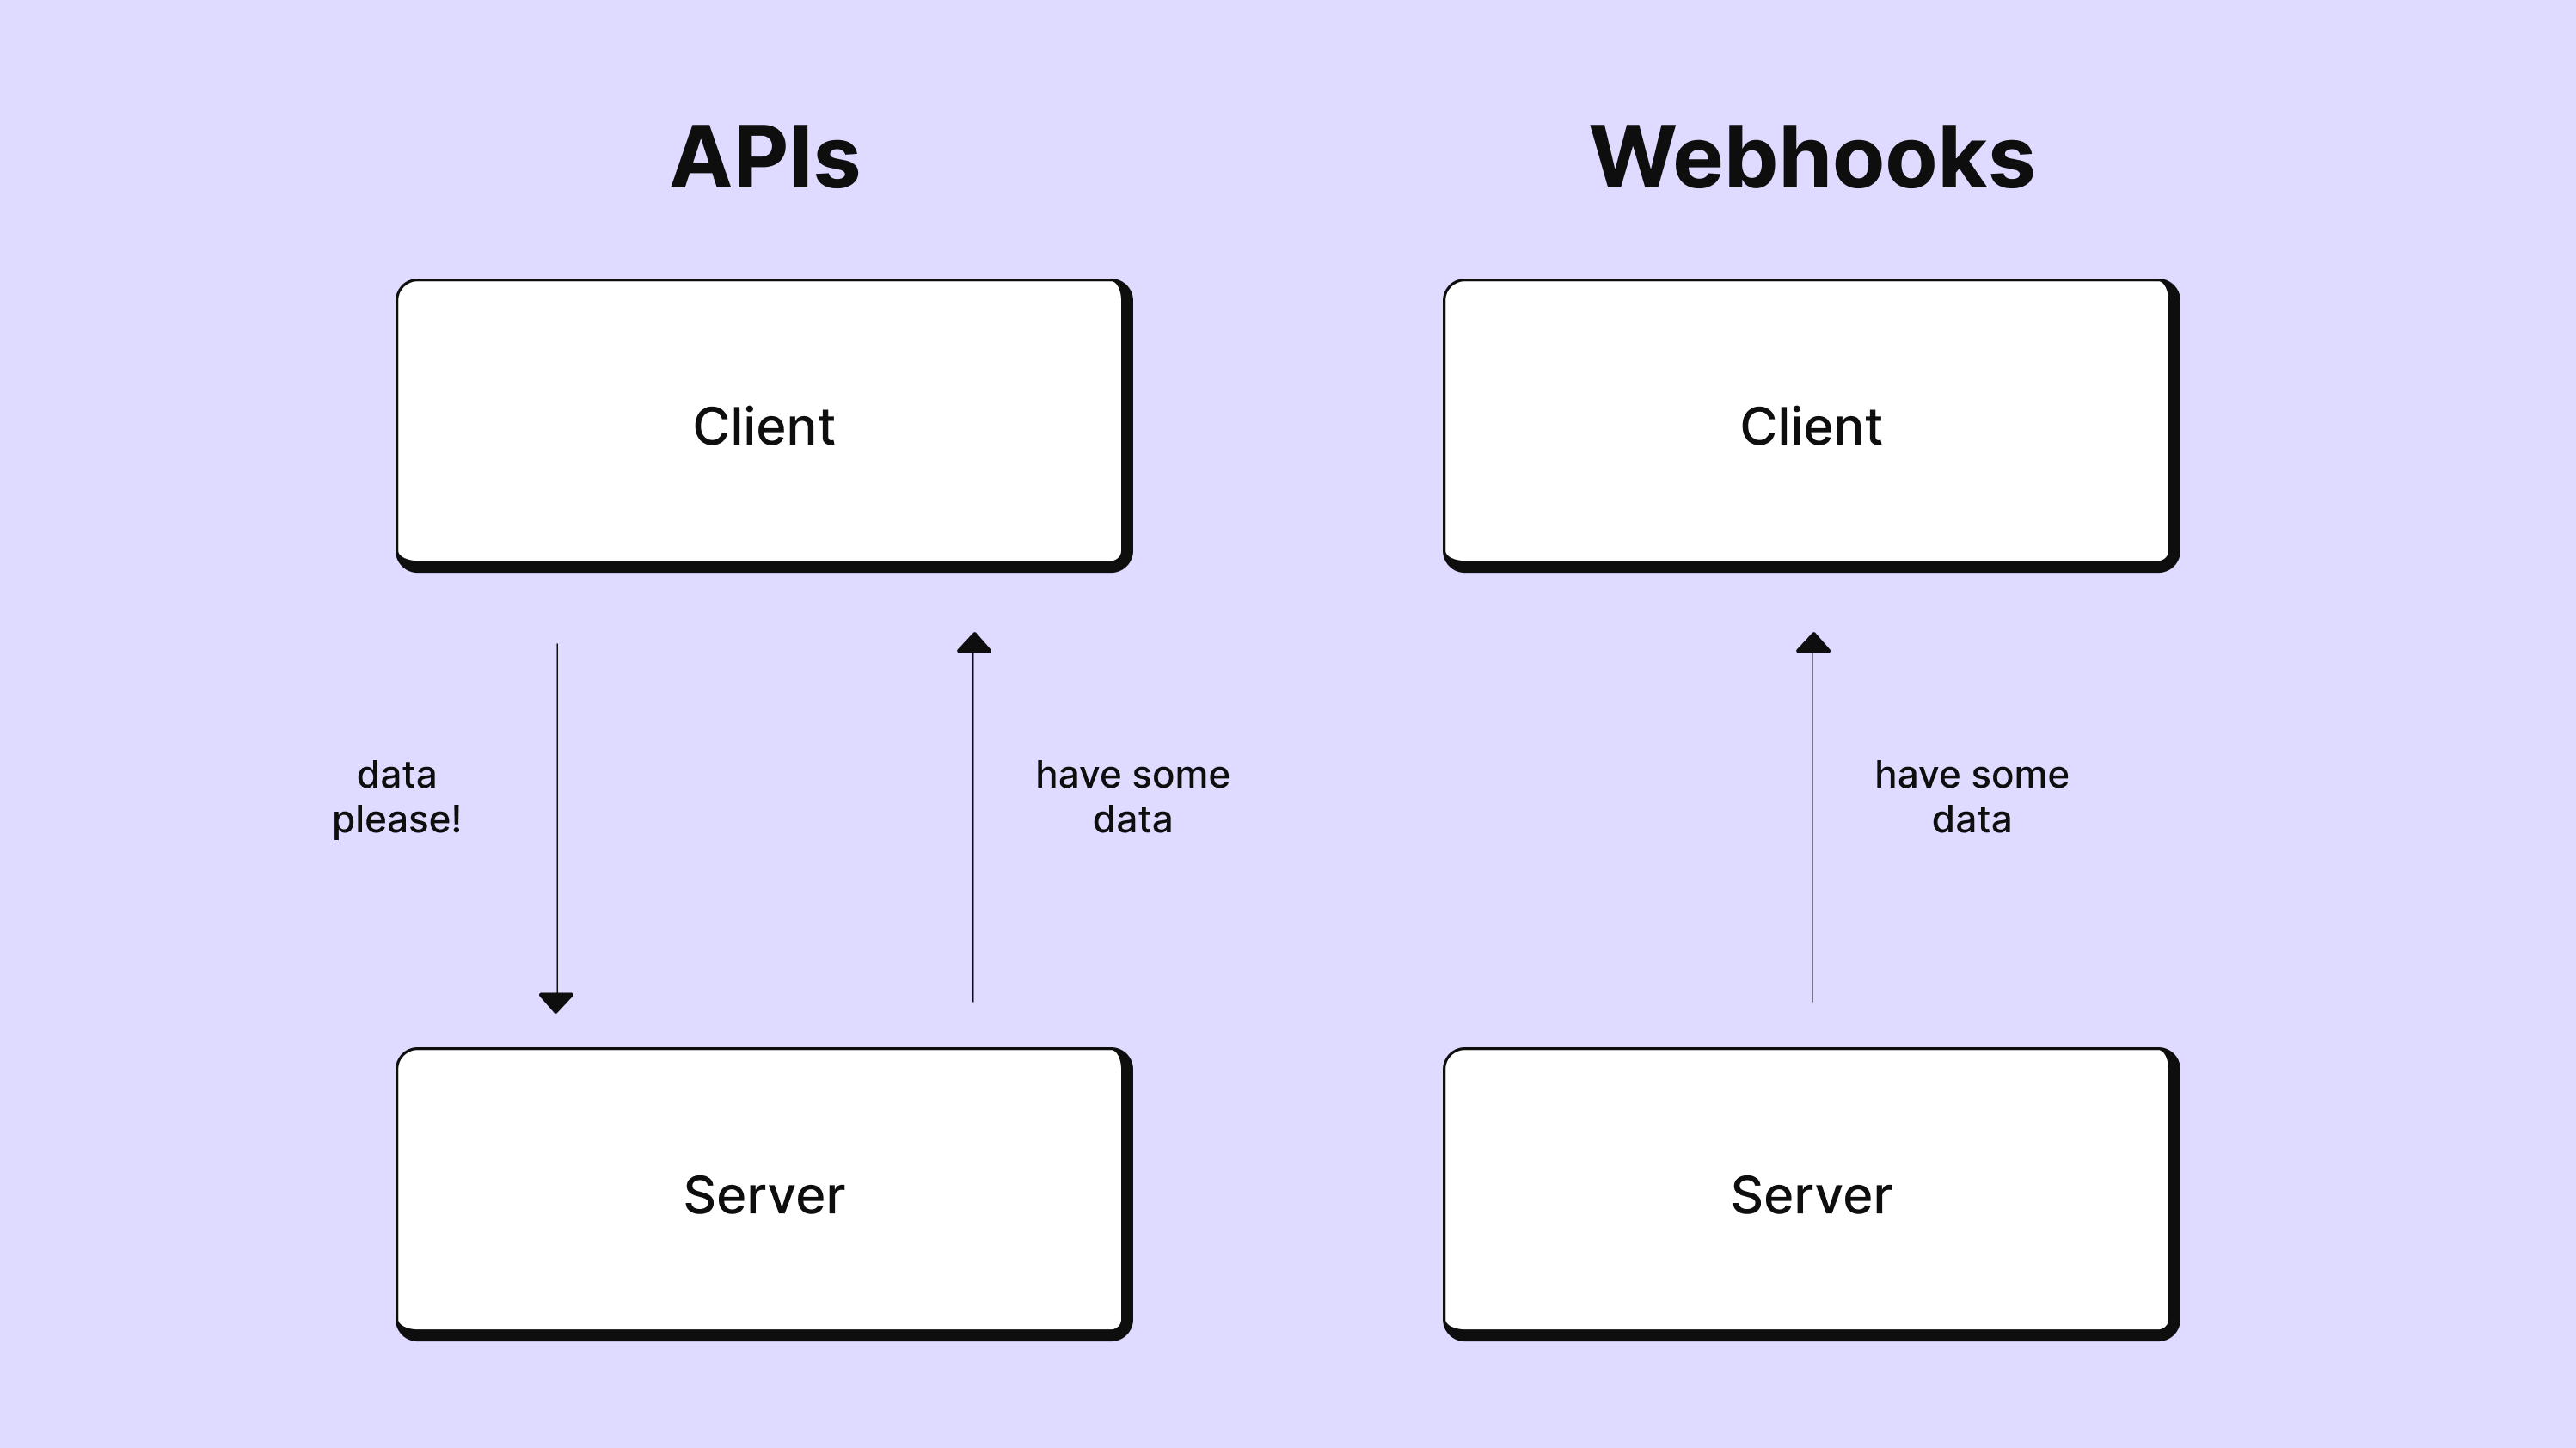
Contrast this with APIs. APIs follow a synchronous request-response model–the client requests data from the server and the server responds. But the API model doesn’t work well with real-time events or data. You would have to continually poll the API to get the updated data, which would tie up bandwidth and resources (and get you rate-limited). Depending on how much data you’re dealing with, you could also potentially miss events.
Webhooks are asynchronous and event-driven. With webhooks, the server sends data to the client automatically when a specified event occurs. This makes webhooks more efficient when you need to receive data as soon as it changes or events occur.
The downside of webhooks is that webhooks can be more complex to implement and maintain. Whereas with APIs it is the service you’re communicating with that sets up the endpoint, with webhooks, you are setting up the endpoint and then giving that URL to the service so they can send data to it. This also means that all the implementation details–error handling, authentication, securing requests–is done by you.
The anatomy of a webhook
So given that, what needs to go into your webhook?
- URL (Uniform Resource Locator): This is the destination where the webhook payload will be sent. This webhook URL points to the server and the specific endpoint that will receive and process the webhook (the "webhook endpoint").
- Event: This is the specific action or occurrence that triggers the webhook. The webhook trigger could be anything from a user signing up to a database update. Each event type usually has a corresponding structure of data it sends.
- Payload: This is the actual data that's sent when the event is triggered. The webhook payload is usually in the json format and includes detailed information about the event data.
- Headers: These are additional pieces of information that can be included in the HTTP request. One common header is a content-type header that tells the receiver how to interpret the data in the payload. Other headers might include timestamps, event types, or security information.
- Secret/Signature: Many webhooks include a security mechanism to verify the data has not been tampered with in transit. This is often a secret or signature that is known only to the sender and receiver. The sender generates a hash of the payload using this secret and includes it in the header or payload. The receiver can then generate its own hash of the payload and compare it to the one received to verify its authenticity.
- Retry policy: This outlines the behavior of the webhook sender when the attempt to deliver the data fails. Some services will attempt to resend the data a specified number of times at certain intervals until they receive a successful response.
- Webhook Response: The receiver should send an HTTP response to acknowledge that it has received and successfully processed the payload. A 200 OK status code is usually used to indicate successful receipt and processing. If the server cannot process the data immediately, it should at least acknowledge receipt with a 200 OK and then process the data asynchronously.
These components might not all be present or could vary in every webhook implementation, but these are the general parts you can expect to encounter.
Example of a real-life webhook
Here’s how some of these look in a real-life application: Nango has webhooks integrated into the product to send events e.g. when a user has connected an external account (details).
Webhooks have the following header:
X-Nango-Signature, which is our signature for authentication
In the body, or payload, of Nango webhooks, we have the type of event, the connection id and then more data about the event:
Building your own incoming webhook listener
Let’s start with a basic example. Let's assume we are receiving an incoming webhook from a service that triggers whenever a new user signs up on their platform. Our job is to take the data from this incoming webhook and process it, in this case, we'll just log it.
We’ll set up a basic server with express in a file called app.js:
Here, we define an async function as the handler for the /webhook route. When a POST request is made to this route, the handler function is triggered.
Inside the handler function, we get the body of the request, which is the data sent by the webhook, and pass it to the processWebhookData function. This function simulates some async processing using a setTimeout.
If everything goes well, the server sends back a 200 status code. If there's an error, we catch it and return a 500 status code.
We can run this using:
How are we going to test this? We need a service to send us some data. Here, we’ll use GitHub as it is extremely easy to set up webhooks in GitHub. Head to your page on GitHub, go to settings, and then to webhooks. You’ll have a webhook settings page like this:
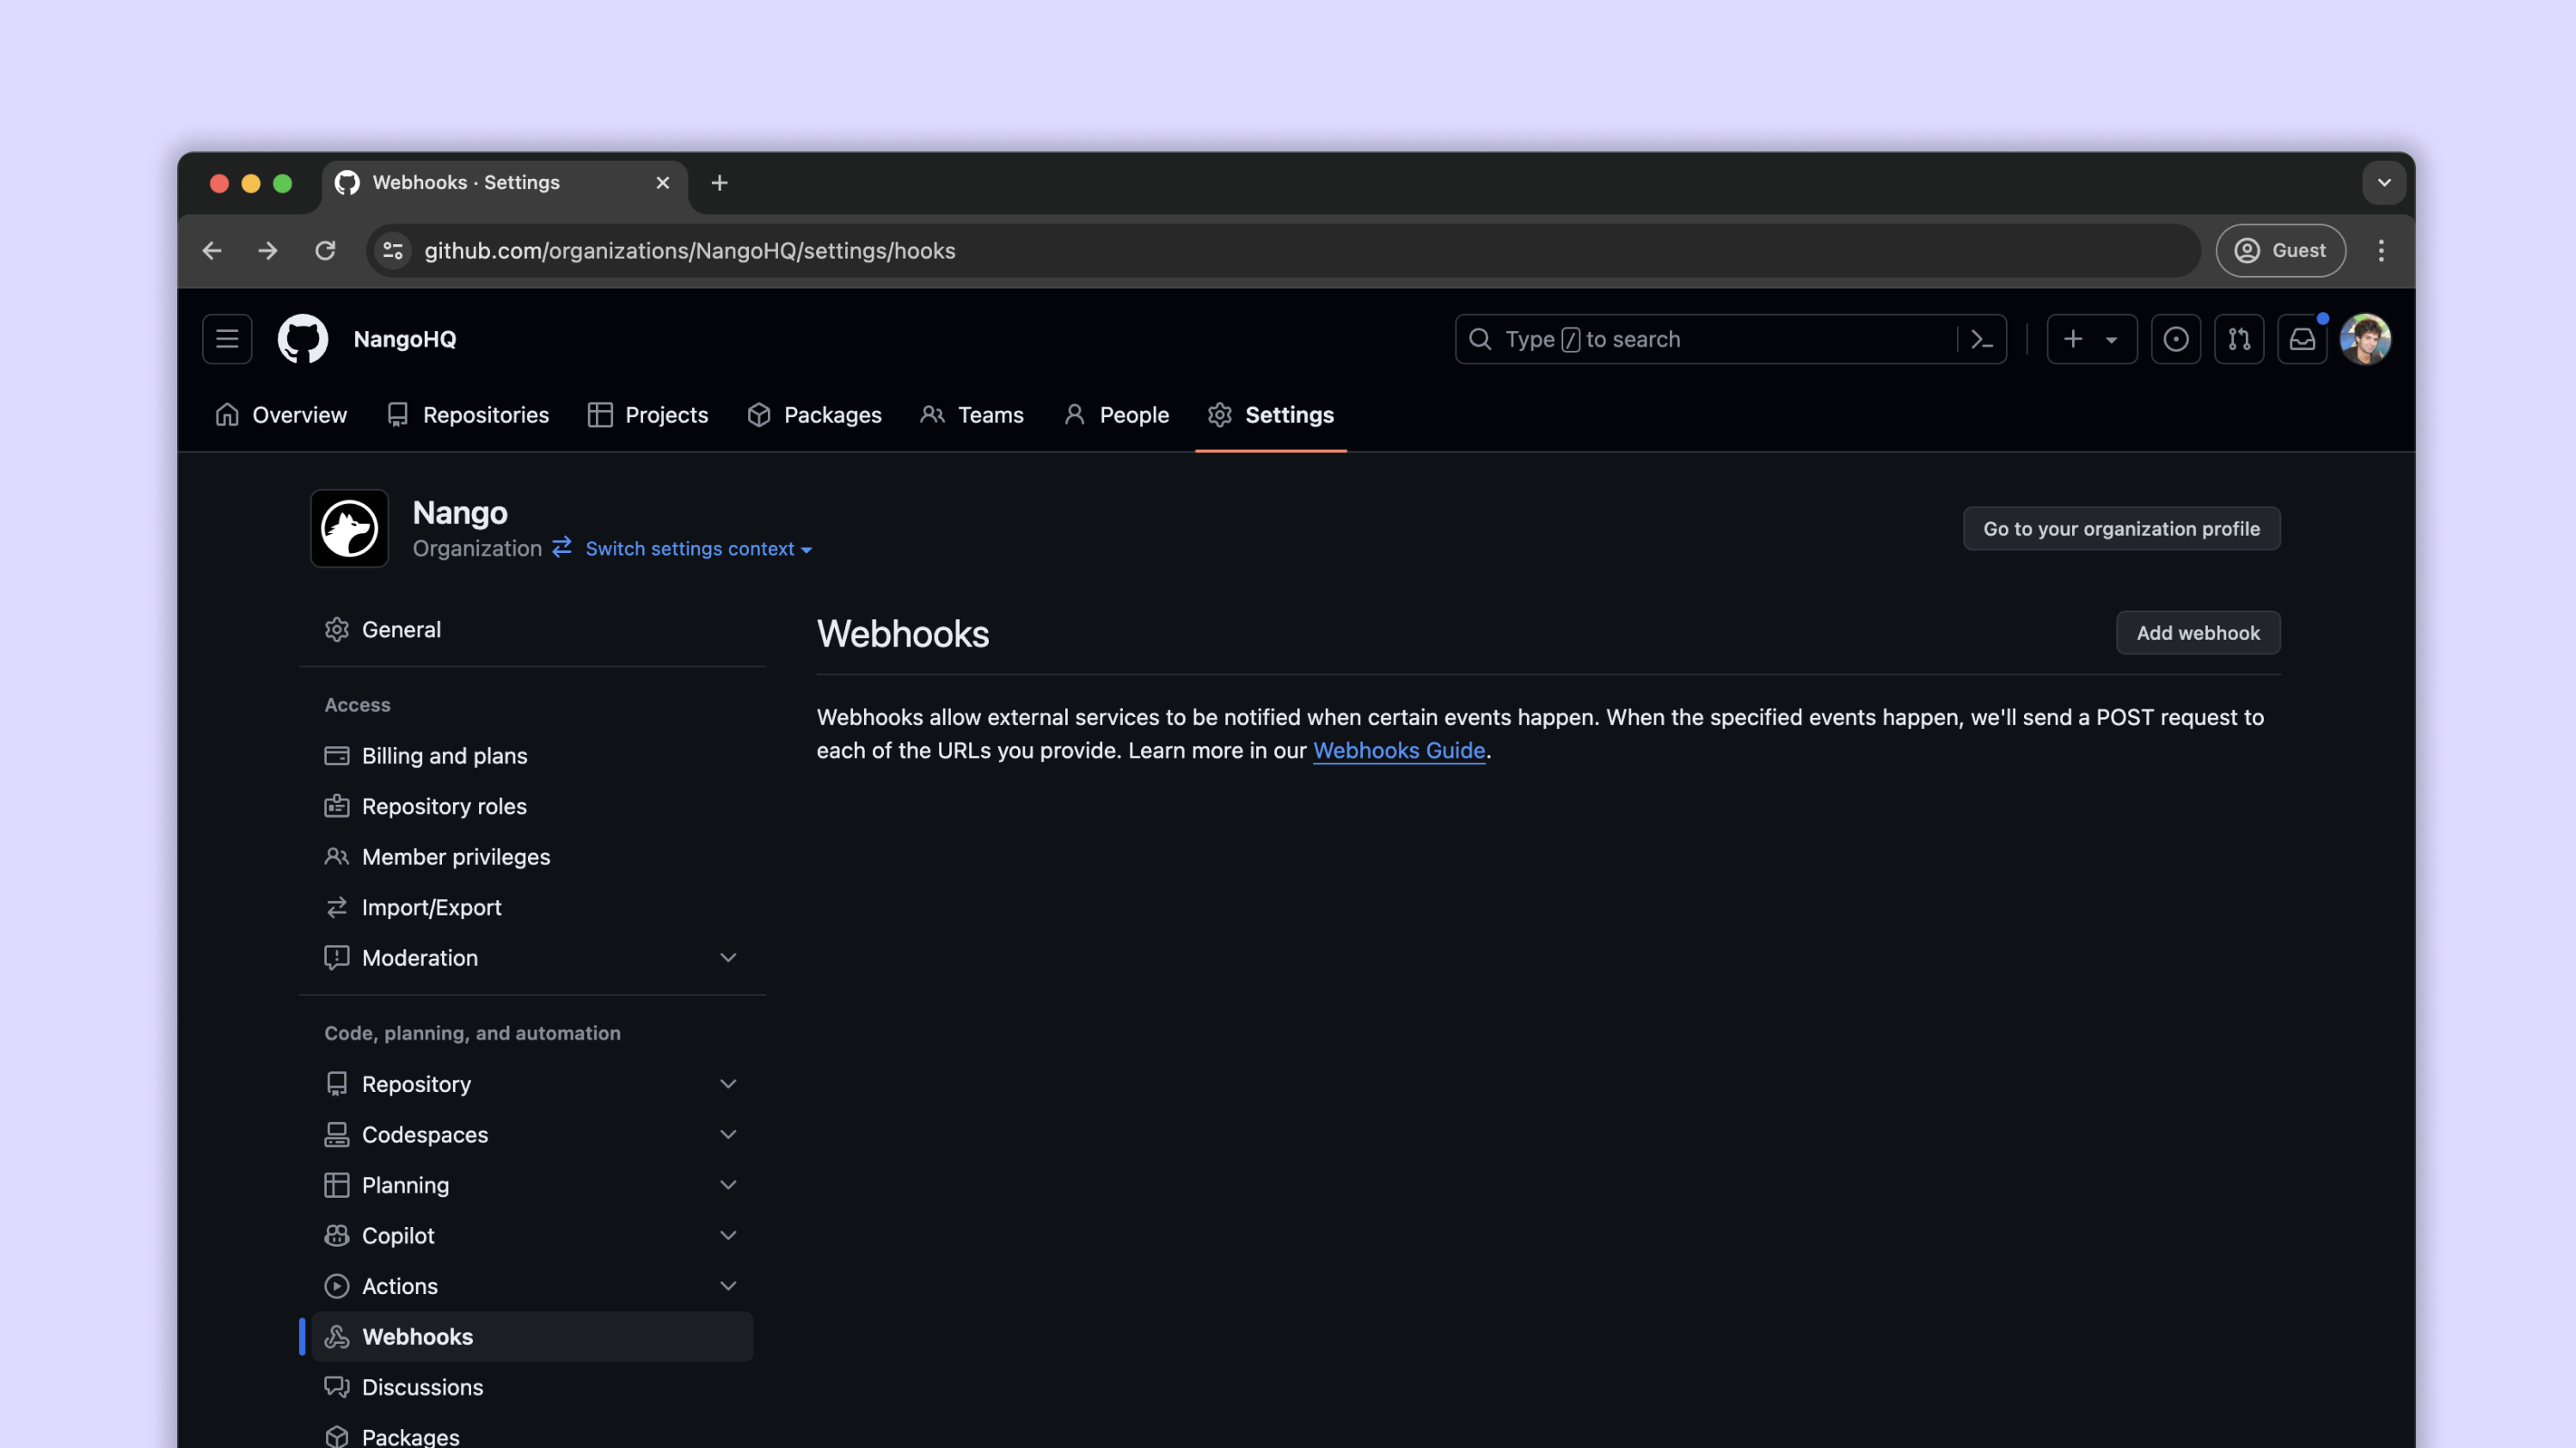
Click on “Add webhook” and you’ll get to a page like this:
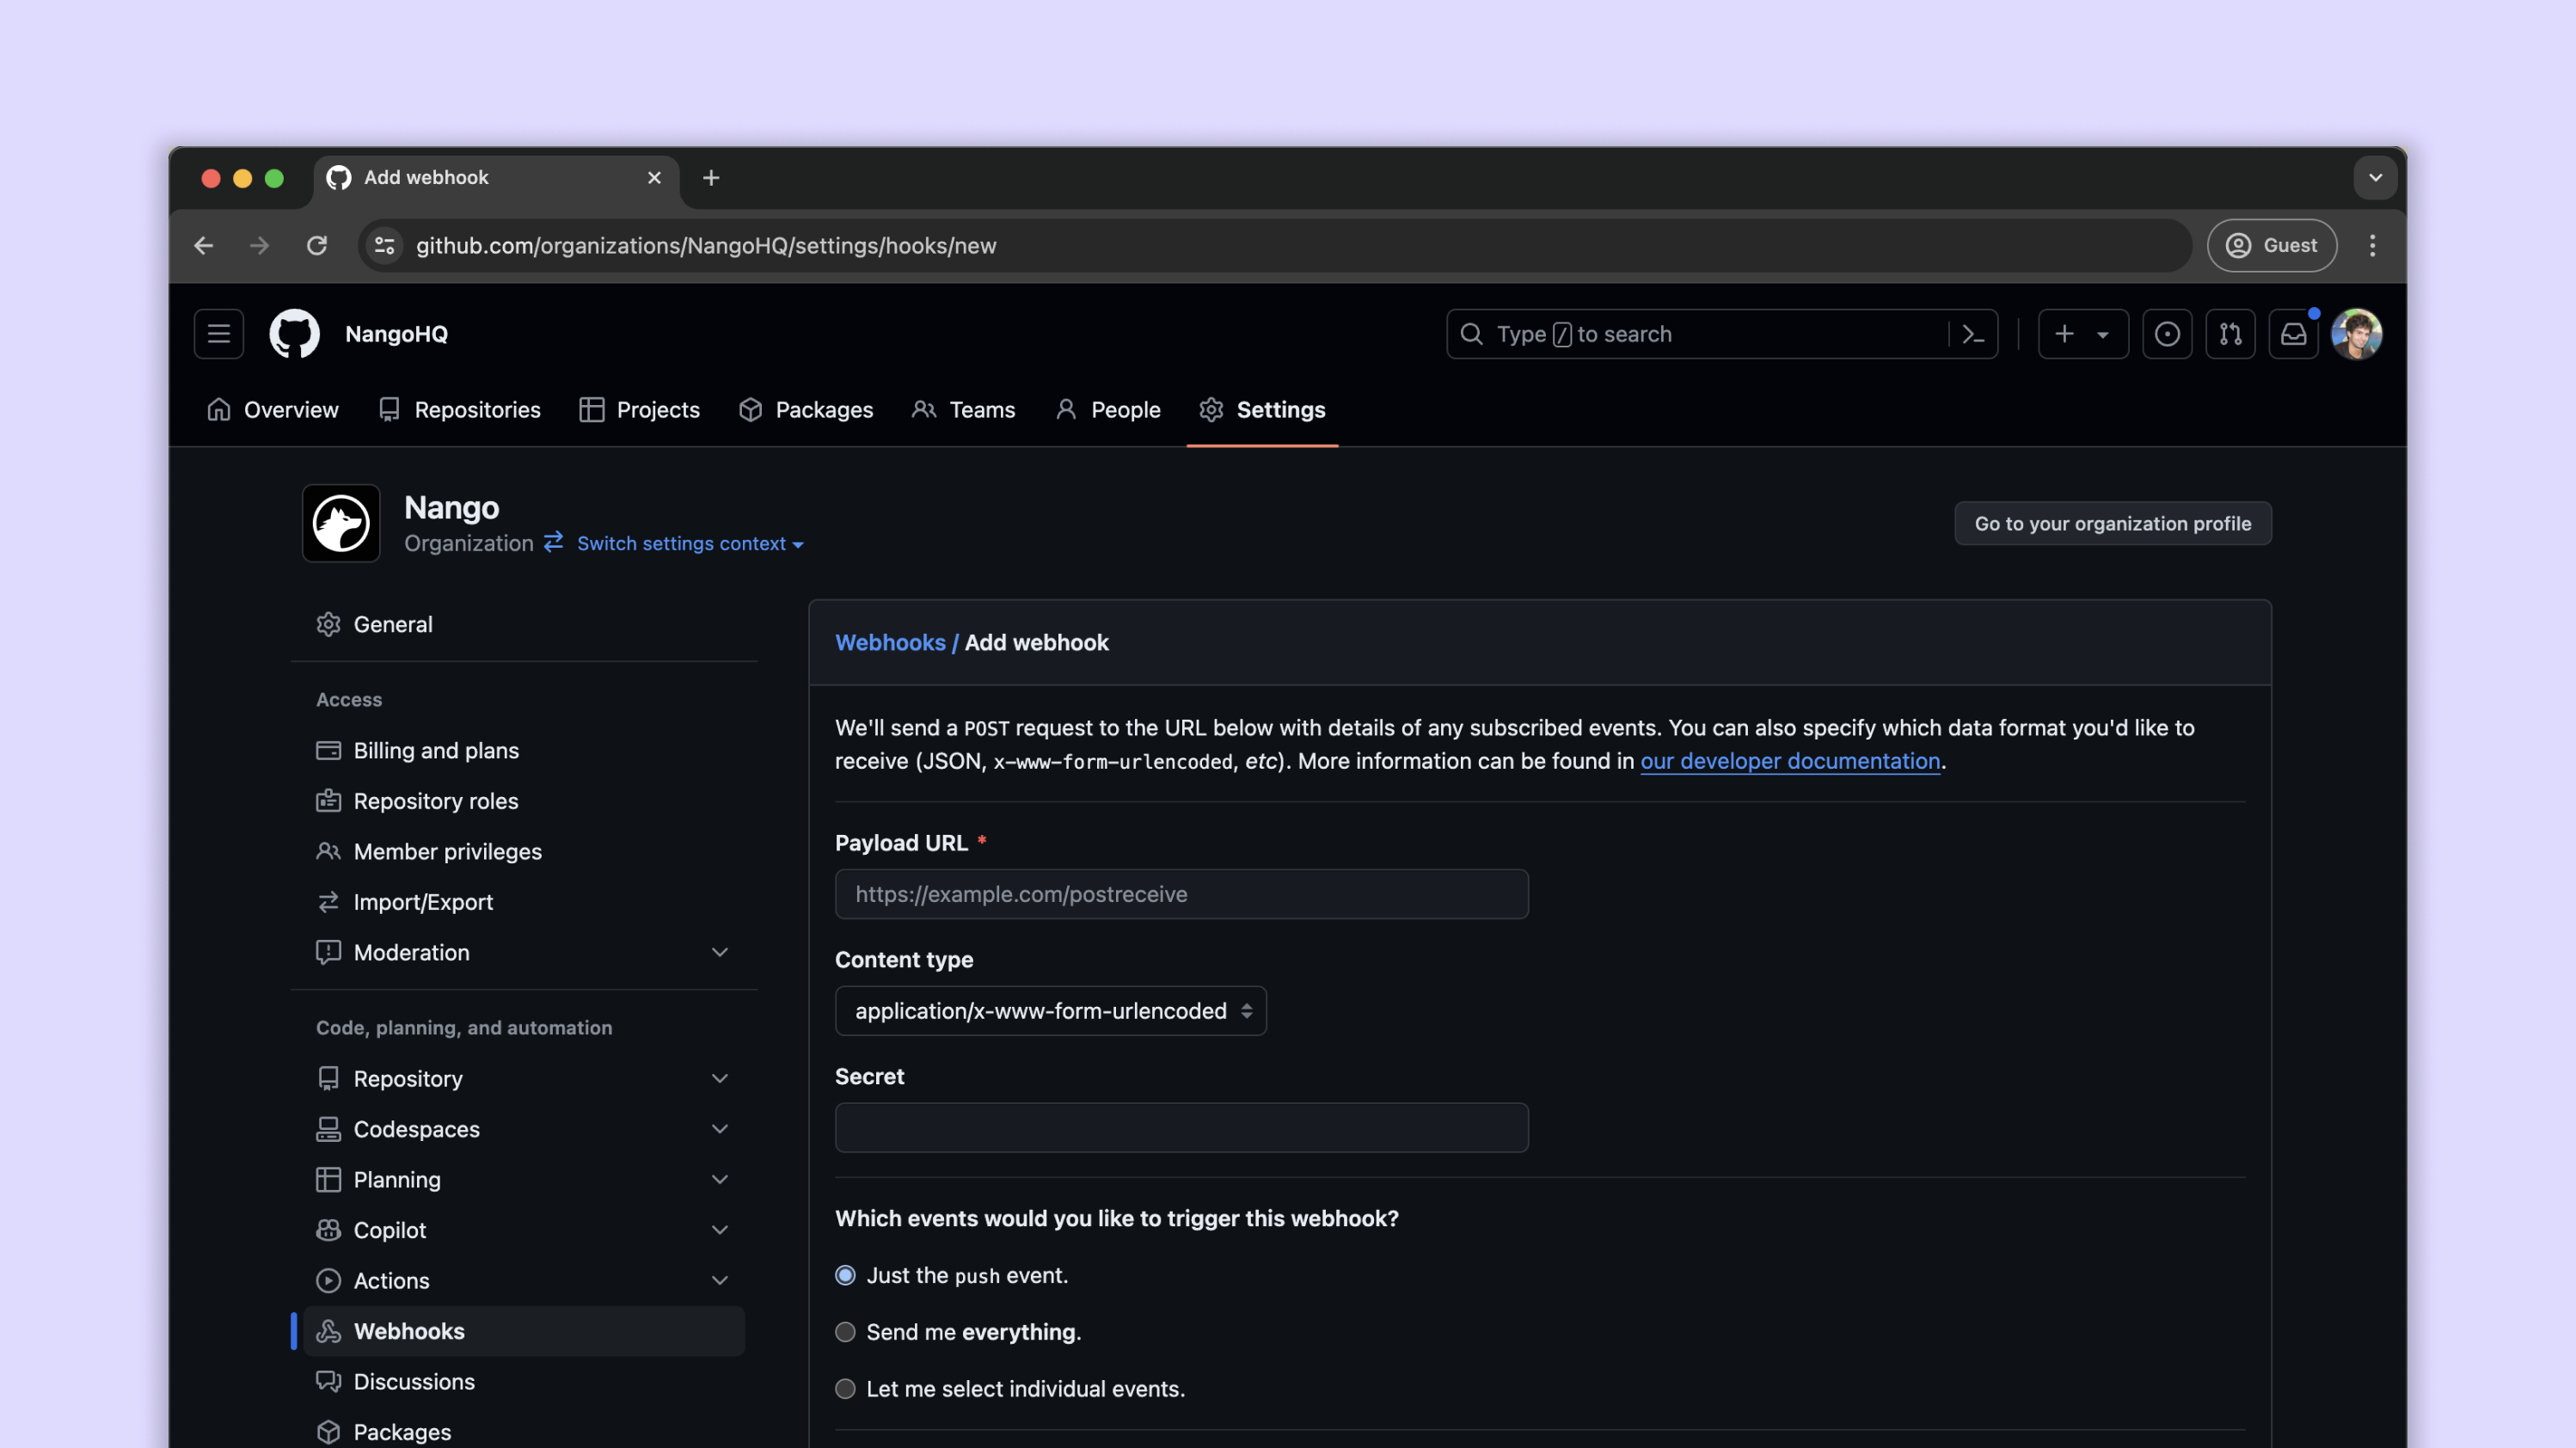
The most important field here is “Payload URL”. This is the webhook URL of your application. Now, you’re probably just using localhost to serve your app now which is only available to your local network. Webhook urls require your server to be publicly accessible over the internet so that the webhook provider can send an http POST requests to it.
To do that with localhost we can use ngrok. ngrok exposes your localhost with a custom URL for testing situations just like this. Follow the instructions to get set up with ngrok and then run it locally to get your URL. It is that URL you are going to add to “Payload URL,” appended with /webhook. So your URL will look something like this:
We’ll add this to GitHub in the url field, and change a couple of the settings. We want the data format set to urlencoded, and we want all events to trigger this webhook. We don’t have a secret set up so we’ll leave that blank.
Click ‘Add webhook,’ and head back to your terminal running your application. You should see data sent from GitHub:
Congratulations, you’ve got a working webhook subscription!
Building webhooks for integrations
The above example is good for testing. But if you wanted to use it as part of an integration, it is missing some functionality. Namely:
- There is no security. If this webhook was live anyone could send any data to your servers.
- There is no data handling. We aren’t parsing the JSON sent by the provider to do anything meaningful.
- There is also no error handling or rate limiting or scaling.
Let’s start with those first two bullet points: security and data handling.
Authenticating webhooks is a little different to authorizaing APIs. Effectively, we want to know both a) the message is coming from the source we intend, and b) the message itself is authentic. A common option is HMAC, which stands for Hash-based Message Authentication Code.
HMAC combines a secret key with the message data, hashes the result with a hash function, combines that hash with the secret key again, and then applies the hash function a second time. The output hash is unique to the input data and the secret key. Thus, even a small change in either results in a significant difference in the output hash.
In the context of webhooks, HMAC is often used to validate that the incoming HTTP post request is indeed from the expected sender and hasn't been tampered with during transmission. The sender will generate a signature (HMAC) of the payload using a secret key, and include this signature in the header or body of the request. The receiver will generate its own HMAC of the received payload using its own copy of the secret key, and compare this to the received HMAC. If they match, the webhook is valid and originated from the expected sender.
Data handling is an easier prospect. The best option is not to apply any logic within the ‘webhook’ function, but to use the webhook url as an entry point into your application and then route data depending on what has been sent. You can do this either based on the payload itself, or via an added header signifying the event type.
Here’s an example of a webhook endpoint with both HMAC security and data routing:
Here, we apply the bodyParser middleware to parse incoming JSON payloads. We also save the raw body to req.rawBody to verify the signature later. When an HTTP POST request is received at the /webhook endpoint, we extract the signature and event type from the headers and the payload from the body. We then generate a hash of the received raw body using the same algorithm and secret as the sender, and compare it to the received signature. If the signature matches, we print the event type and payload to the console.
We then use the Fetch API to send a POST request to another server to notify it about the received data. We send a 200 OK status code back to the webhook provider to acknowledge that we've received and processed the incoming webhook.
Here is where testing (and documentation) becomes important. Most providers aren’t going to have an x-signature or an x-event header–they are going to be called something else. For instance, with HubSpot api integrations, these are X-HubSpot-Signature and eventType, respectively. You have to tailor your webhook to fit the payload the provider is going to send. The good news is that these are often well-documented and larger providers are going to provide you with a lot of information to make the parsing and logic within your application easier to build.
Good testing tools here are services like RequestBin or webhook.site that give you a public URL to add to a provider so you can see the data they send without having to set up your own server. You can get an understanding of the payloads, the data types and structures, and headers sent and then tailor your own endpoints to fit the providers.
Scaling your webhook integration
Scaling can be a problem with your webhooks integration for a few reasons:
- Resource consumption: Each incoming webhook is an http post request your application has to handle. If your system is not designed to scale, a sudden influx of incoming webhooks can overwhelm your server's resources (like memory, CPU, and network bandwidth), and lead to slower response times or even downtime.
- Blocking operations: If your application handles a webhook request by immediately performing a time-consuming operation such as a database write or a call to an external API, this can block the application from responding to other requests. This problem can be exacerbated when the volume of webhooks increases.
- Retry storms: Webhook producers usually implement retries when the delivery of a webhook fails or when it doesn't receive a timely response. If your application starts slowing down or experiencing errors, the producer will keep trying to send the webhooks, creating an avalanche of traffic that your application might struggle to recover from. This is also known as a "retry storm."
- Data Ordering: Some applications need to process webhooks in the order they were sent. This can complicate scaling, as distributing processing across multiple workers can make maintaining the correct order more challenging.
- Synchronization issues: If your application depends on external services or shared resources (like a database) to process webhooks, you might run into synchronization issues when scaling up, as multiple instances of your application try to read from or write to the same resource simultaneously.
- Rate Limiting: If your application sends requests to another service as part of processing a webhook, that service might rate limit your application if it makes too many requests in a short period of time.
To handle these scaling issues, you'll need to implement scalable architectures and patterns, such as using a queue and worker pattern for asynchronous processing, using auto-scaling to adjust resources based on demand, implementing robust error handling and retry mechanisms, and carefully managing access to shared resources.
We can add queues to our endpoint using bull and redis:
Here we create a new Bull queue and add incoming webhook events to the queue. The webhookQueue.process() function is where you define how to process jobs in the queue. In this case, it sends a POST request to another server with the webhook data.
Potentially, you’ll also have to scale horizontally, adding webhook urls for many third-party integrations. In that case solutions such as Nango can allow you to handle many integrations together without building separate logic for each service. This can make your webhook integration significantly easier to implement at scale.
The power of webhooks
Webhooks are a powerful tool for creating real-time, responsive applications. They enable systems to communicate and react to events as they happen, bridging the gap between different services and systems in a scalable and efficient way.
But handling incoming webhooks comes with its own set of challenges. Implementing a webhook integration is not a one-size-fits-all process. Your application might have unique needs and challenges, and the solutions should be tailored to those needs. However, with the principles and patterns we've discussed here—like async processing, rate limiting, and scaling—you're well-equipped to design and implement an effective webhook handling system.
Keep in mind that the ultimate goal of using webhooks is to create seamless product integrations and real-time interactivity that enhance the user experience. With careful planning, thoughtful implementation, and thorough testing, webhooks can become an integral part of your application's toolkit, driving engagement and supporting the growth of your platform.
Skip the hassle: Using a platform for webhook and product integrations
If you want real-time data syncs for your integrations, but avoid the hassle of building your own webhooks handling infrastructure, you might want to look into Nango.
Nango gives you a single API for all your integrations. You get full control over your integrations, without having to dive deep into the quirks of every API (such as how webhooks work for it).
Learn more about Nango on the docs or join the Slack community with 1,300+ developers building product integrations with it.
